Monday, May 31, 2010

Wrapped up in string: no-sew fabric earrings.

Here is another project inspired by my trip to Spain. I spotted something really charming in - of all places! - the gift shop of the world's oldest bullfighting ring. I know: bee-zarre!

The bullring in Ronda, Andalusia is a pretty fascinating place. No, I was not there attending a bullfight - just taking a peaceful tour thorough the museum and absorbing some history. (Although I respect other people's right to like bullfighting, I cannot like it myself).

Anyway - the gift shop. Sorry about the blurry photo, it's the only one I was able to snap. They had these earrings:

I just think they're so cool. I didn't want to copy them exactly, but hope you like this tutorial for my simplified take on them. You will need:

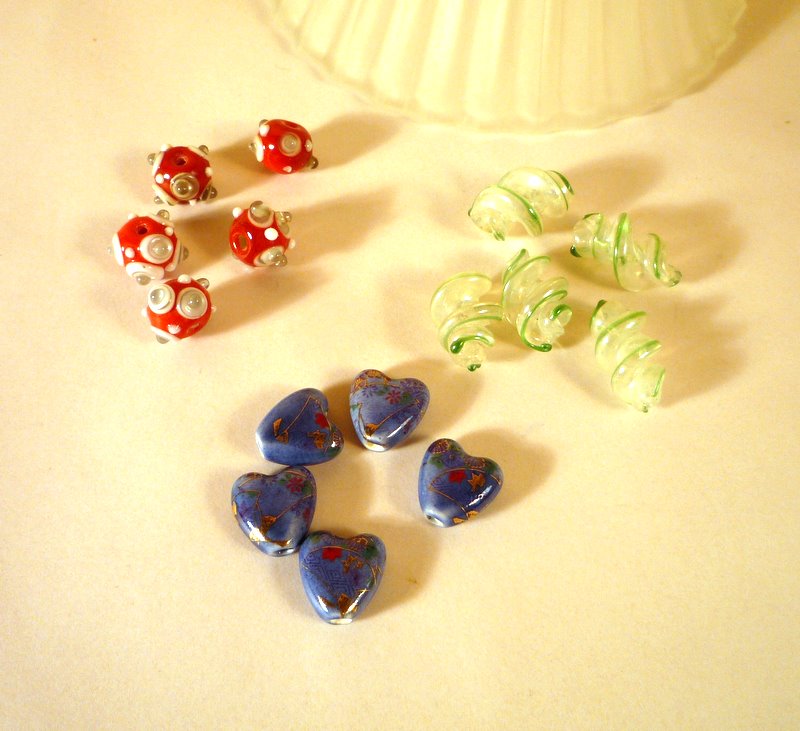
A bitty fabric square, an ugly bead, complementary thread. And some findings: an earwire, a headpin and a little chain.

Assemble the findings as shown, and wrap your fabric around the bead, like so:

Wrap thread around the gathered fabric, and tie it off.

You are done!

The red ones feature a Japanese wrapping cloth, from Tokyo and my lovely sis-in-law. The green/gold ones are from a dollar store Xmas table runner. With those, I used fabric circles instead of squares,
for a less spiky ruffle.

I like how the translucent fabric looks - very playful and fairylike. I'm also thinking I want to try a colorful bead inside some tulle - wouldn't that be cute?

Here's a different method, which doesn't use chain, and has an embellishment on the bottom. I took these ingredients:

Poked the headpin through the center of the fabric. Then wrapped it and tied it as before.


See how the headpin and spacer turn into a decorative element? Then add your earwire, and voila!

The original earrings had some bling-y rhinestones on top. I added a small measure of bling to these green/beige ones, using a crystal bead...

On those I also trimmed the ruffle down closer to the wrapped thread, and used heavier fabric. Makes for a whole different look.

Okay, I know you all have a million fabric remnants by you. Try a little wrapping and see what you come up with!


Sunday, May 30, 2010

Make a swirly (extra girly).

Where have I been for the past few weeks? I was very lucky to get to go to Spain. We stayed in Seville, and explored a bit around Andalusia's little white hill towns. Here's one of my favorites, a town called Ronda.

Ahh. So beautiful.

Throughout my trip, I kept an eye out for crafty ideas. The first one I want to show you is some...thingies...I found in a jewelry shop in Seville's old Barrio Santa Cruz. I didn't know what they were, and had to ask the lady. Have you seen them before?

You can't tell from the picture, but they are teeny tiny. (Suddenly I'm wondering if they're really so mysterious. Maybe you all have dozens of them already, and I'm the only dork in the world who has never run across them? Well, they were new to me.) Okay, here's what they are...

Little hair ornaments. The cutest! Really fun worn sprinkled amidst an updo.

Fun, yes. But kind of expensive. I paid 5 euros for these! Horrors! So I ask you: why on earth should we spend our hard-earned euros buying other people's hair swirlies, when we can easily make our own? Are you with me?

Start with some short lengths of wire. Flexible enough to bend into a swirl, but not too flimsy - it has to be able to keep its shape. I used some ornament hangers, 100 for a buck at the $ store.
Leaving a little extra length at the top, wrap your wire around something taper-y. A pen...


...or anything you can find.

When you pop the wire off, you can sort of manipulate the swirl to get it fairly regular looking. (Although lots of mine were pretty irregular, and they worked just fine. Do not stress over it. I'm talking to you, perfectionists!)

Bend the straight bit so it sticks up at right angles to the swirl.

Put a bead on the wire. Bend the wire over sideways, like this:

Make a loop above the bead to hold the bead in place. That's it!

Your girly swirlies are ready for their updo.

You can try all kinds of bead combinations. Nothing too big, though - these are meant to be dainty and barely there.

I tried some little silk blossoms, too. They worked great! Even lighter than beads.

A small caveat. The wire ends of the store-bought ones were tipped with a rubbery coating, to protect from pokes. There's this stuff you can buy, a liquid plastic, which I would recommend if you're making these for a little girl. But for me, the bare wire wasn't so scratchy that it bothered me - I think you could call it optional.

Hope you liked this project! Tomorrow, another tutorial inspired by stuff I saw in Spain.

Thursday, May 27, 2010

Enter to win the Crazy Crafty Wicked Cool Envelope of Doom!

Hi, you guys! Just wanted to explain why I haven't posted lately. I've been away, traveling in a strange land. I've come home with my head (and my little rolling suitcase) stuffed with inspirations and ideas. Can't wait to share them! I'll be posting soon.

In the meantime, though, how about a GIVEAWAY (whoohoo!) combined with a really testing CRAFTING CHALLENGE? (Ooh, scary.)

When I began this blog, it was because the lovely Heather M. of Dollar Store Crafts sent me an envelope of random junk as part of her SuperSecret Stashbust challenge. Here's what was inside:

I challenged myself to make ten things from her items - I managed to do it, too! It was hugely fun and inspiring. (If you haven't had a chance to see what I made, here are all ten projects.)

But! I didn't use everything from Heather's stash. There are a number of cute, strange or beautiful items still waiting to be transformed. I could use them myself. But I thought it would be more fun to distribute them to some other hardy crafters. (And if you entered Heather's original giveaway and didn't win, here's a second crack at it!) And so! I hereby announce...

The CRAZY CRAFTY WICKED COOL ENVELOPE OF DOOM inspirational challenge!

I'm calling them 'envelopes of doom' because the items are going to be pretty eclectic. Okay, insanely diverse. And a few, possibly mind-bogglingly awful. It's up to YOU to re-imagine and transform them into wicked coolness. Here's the plan:

I shall divvy up the remaining bits of of my SuperSecret Stash into five envelopes. I shall add a bunch of nifty stuff from my own personal stash. And I shall send it to FIVE OF YOU CLEVER PEOPLE, if you promise to make at least three interesting things from the contents, and post them online for us all to see.

Also, since this is kind of a "craft-it-forward" deal, I think your assignment should be to make things for other people - in other words, come up with three gift ideas, and tell us how you gave your creations away.

If you would like to play, leave a comment at the end of this post. Deadline: June 10th. (Note:
you don't have to live in the U.S. to enter, I will send envelopes to anyone anywhere.)

Enter now! Your manila-encased doom awaits.

Oh, yes - very important - please please please, when leaving your comment, be sure to include your email address so I can write to ask where to send your envelope of doom. Seriously, I need to be able to contact you - do not forget!

UPDATE: THIS CHALLENGE IS NOW CLOSED. Stay tuned for brilliant results from the winners!

Friday, May 7, 2010

Tasty faux-bakelite earrings.

Today, a selection of lovely earrings:

Brought to you by this delicious pupu platter!

I bought these tiki forks for $1 on sale.
Don't they look like bakelite?

For jewels, I think they're pretty all by themselves -

Or with a few small embellishments.


I have some other ideas for these forks in the back of my mind; I suspect they will reappear in future posts. In other words...

Don't stick a fork in me - I'm not done crafting!

Thursday, May 6, 2010

Some cutting remarks.

Sometimes I see a cool little object, and want to make it into an even cooler little object, but it's just not quite the right size, or shape, or mood. A handy dandy pair of scissors will often fix that right up.

I bought these at the dollar store, in the form of an Easter garland:

They're made of that sort of stiff, heavy felt. There were six crosses and six butterflies. I bought them the day after Easter, at 50% off. Fifty cents, people! Fifty cents for 12 cool objects.

Immediately, I thought, "Pretty! For earrings!" Then I thought, "Yeah, if your ears were the size of baseball mitts." (The butterflies are about as big as your palm. The crosses are smaller, perhaps slightly more earring-able, but still. Is there anyone out there - I don't care how much she loves Easter - who really wants a fuzzy, 3-inch-long, neon green Byzantine cross hanging from her ear lobe?)

So that's when I started snipping with said handy dandy scissors. Trying to isolate segments that had a pretty shape. I found a shape I liked; added earwires. And then there was:

Next thing I knew, the fur was really flying. And then there were:

I really had fun dismembering, er, taking apart the filigree shapes and assembling them into - if I do say so myself - some cool little objects.

I also tried adding a teeny bit of shading with a Sharpie. It's subtle, but I think it helps give some dimension:

Okay, I know these are weird. They're not for everybody. But in my mind, if I find a way to use the word 'subtle' in the same post as the phrase 'fuzzy, 3-inch-long, neon green Byzantine cross,' I count it as a success!

A necklace. Kinda shmancy.

So. We meet again. Remember these, from my last project?

Just a quick post today to show you something new I made with them.

I put together a long, swirly wirework necklace, hoping to make something that looked a bit shmancy. Something that wouldn't scream "paper clips!" the minute you saw it. Here's how it turned out:

(click on photo to see it bigger)

I like the gold enamel beads in harmony with the wires. I think it looks rich and fun.

I plan to try this with some other beads, too - it's the kind of project that will become a completely different animal, just by changing the style of bead.

F'r instance, I might try it out with some of these, perhaps...

Hmm. Food for thought, food for thought.

By the way, the gal for whom I made this Frog Queen necklace knows who she is, right, Luanne?

Nobody tell her it's made of six paperclips and five beads, and cost less than 3 dollars! :)

Tuesday, May 4, 2010

Outsource your jewelry box!

Hi! Do you think these are interesting?


Or these?


How about:


Or even:


If you like the look of hand-coiled wire earrings, but don't wanna coil them yourself, you can outsource the job. Seriously, it's super easy.

Here's what you do.

Wait for it...

*

*

*

Go to Staples. Buy a box of these:


How easy was that?

There are lots of fancy-shaped paper clips available; I plan to try this experiment with others as I find them. But it was the antique-gold finish of these, and the elegant swirls, that really grabbed me. The box cost $2.99.

To make a pair of earrings, you'll need minimal supplies. As in, 2 paper clips and 2 earwires.


For some designs you'll need a pair of pliers, just to open and close the earring finding. But for many,
you won't need any tools at all. You can just thread the earring loop onto one of the paperclip ends, and follow the shape around until the earwire is centered at the top.

I find it's best to start them all with this move:


I just flipped up the 'u'-shaped paperclip part, so it ends up being above the musical note. Then I uncrossed the wires of the musical note, so there are two swirls side-by-side. Like this:


You can simply thread on your earwires and wear them like that -


Kinda cute? That's a two-second earring. Can't be bad!

From that starting point, I just experimented and twisted and wiggled them into all kinds of fun shapes. I wrapped parts of the wires around a pencil to make some extra loops and curves. You can add a bead or two for variety.

But really, I think the wirework is the real focus. Oh, man, I looove these paperclips!


Wait til you see what else I'm going to do with them.